Welcome to CraftsGalore! On CraftsGalore you will find all types of crafts. There will be crafts for kids and adults alike. I hope that everyone enjoys the crafts that I post!
Thursday, December 24, 2020
DIY Dollar Tree Christmas Garland
Wednesday, December 23, 2020
DIY Advent Calendar
With its 24 openings, a mini-muffin pan makes a perfect base for a treat-filled Advent calendar. Because the numbered coverings are held on by magnets, you'll be able to bake with the pan again after Christmas.
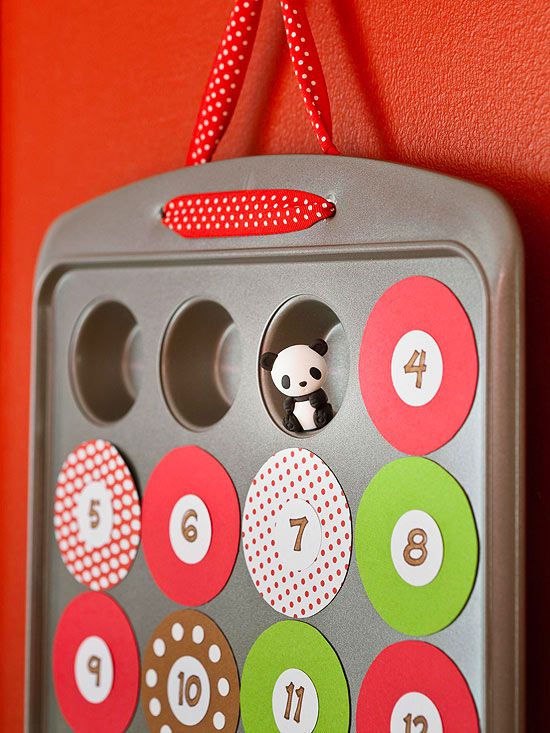
1. Cut 24 circles 2 1/4 inches wide from a 12- by 24-inch adhesive magnetic sheet. Adhere them to patterned paper, then cut them out.
2. With a 1-inch circular punch, make 24 paper circles. Number them and use a glue stick to attach them to the magnetic circles.
3. If you'd like to hang the muffin pan with a ribbon, make two holes (see tip below).
4. Fill the muffin wells with tiny toys, stickers, bite-size candies, notes, and activity suggestions.
Crafter's Tip: To hang the pan on a wall, set one rim on a block of wood and use a hammer and a nail to make two holes. Loop a ribbon through them and tie.
Tuesday, December 22, 2020
DIY HairBow
To make these hair bows you'll need:
1) Satin Laces (different size and colors)
2) Thread and hook,
3) Scissor,
4) White glue,
5) Hair clip (to attach the bow),
6) Ruler (to measure the length of laces),
7) Others (Crochet lace, pearl beads, beads etc.)
Add TipAsk QuestionCommentDownload
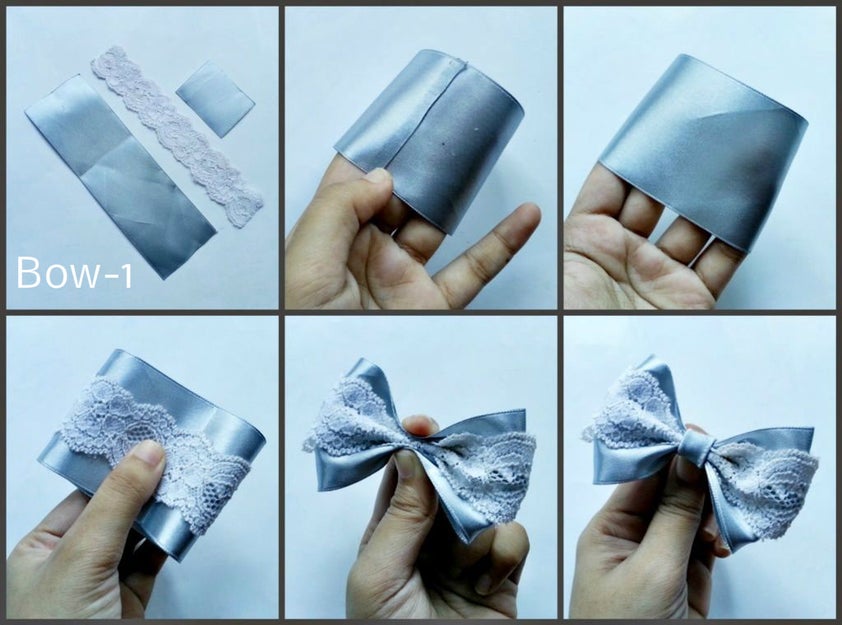
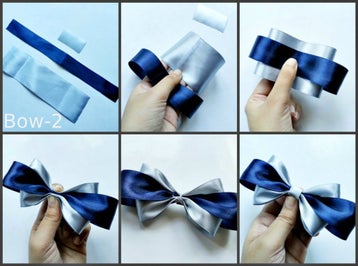
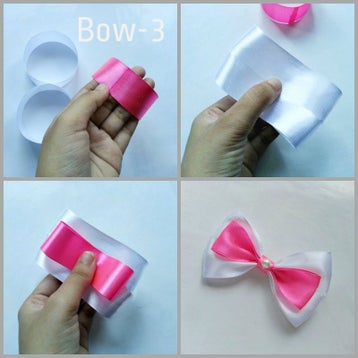
I've posted photos of important steps and lace measurements for each bow. Make sure to keep a small amount of lace for every bow to tie a knot in the middle. Attach the bow with a hair clip by sewing or gluing.
Bow-1: Ash satin ribbon (2 inches width, 7 inches length), I've used 7 inches of length for most of the bows.
Lace ribbon (1 inch width, 7.5 inches length)
Bow-2: Ash satin ribbon (2 inches width, 7 inches length)
Navi satin ribbon (1 inch width, 7 inches length)
Bow-3: White satin ribbon (2 inches width, 7 inches length)
Pink satin ribbon (1 inch width, 6 inches length)
You can make these bow by simply following the pictures.
Add TipAsk QuestionCommentDownload
Step 3: 3 Ribbons Hair Bows
3 More Images
I've posted photos of important steps and lace measurements for each bow. Make sure to keep a small amount of lace for every bow to tie a knot in the middle. Attach the bow with a hair clip by sewing or gluing.
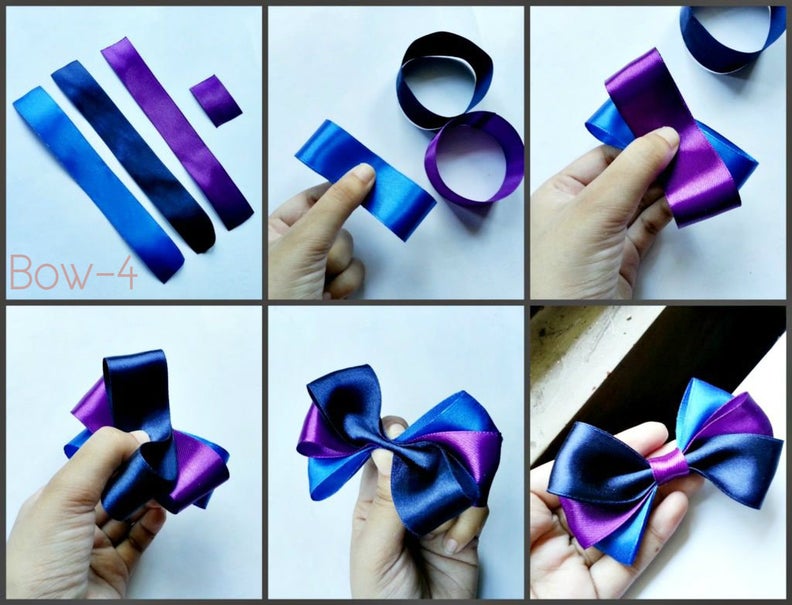
Bow-4: 1 Purple satin ribbon (1 inch width, 7 inches length)
1 Blue satin ribbon (1 inch width, 7 inches length)
1 Navi satin ribbon (1 inch width, 7 inches length)
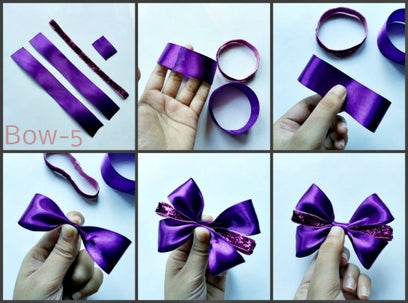
Bow-5: 2 Purple satin ribbons (1 inch width and 7 inches length)
1 Glittered velvet ribbon (1 cm width and 6.5 inches length)
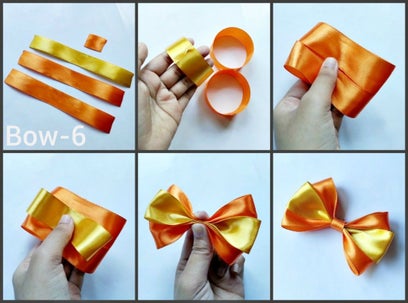
Bow-6: 2 Orange satin ribbons (1 inch width, 7 inches length)
1 Yellow satin ribbon (1 inch width, 5 inches length)
Bow-7: 2 Pink satin ribbons (1 inch width, 7 inches length)
1 Pink satin ribbon ( 1 inch width, 5 inches length)
Bow-8: 1 White satin ribbon (1.5 inch width, 7 inches length)
1 Hot pink satin ribbon (half inch width, 7 inches length)
1 pink satin ribbon (0.5 inch width, 8 inches length)
Bow-9: 1 Cream satin lace (1 inch width, 7 inches length)
1 Black satin lace (1 cm width, 7 inches and 12 inches length)
You can make these bow by simply following the pictures.Step 4: 4 Ribbons Hair Bows
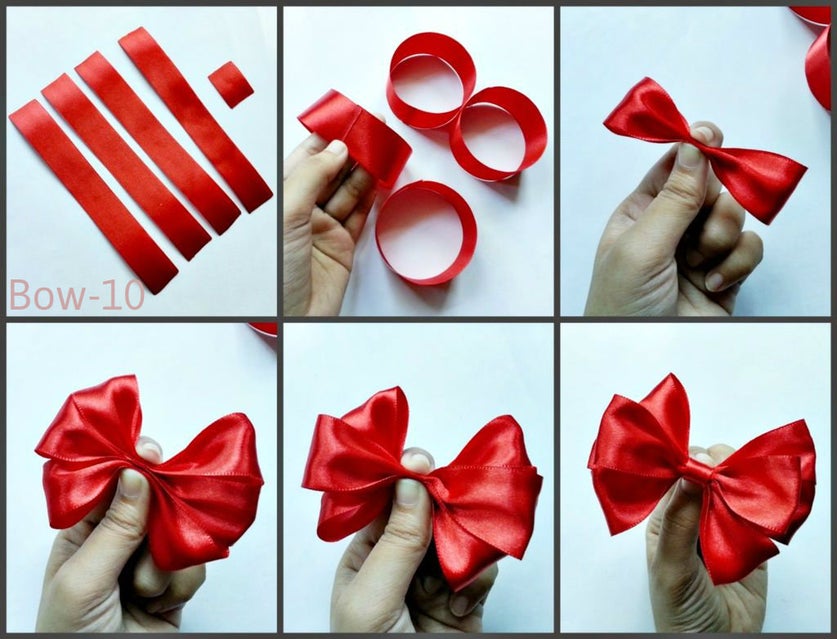
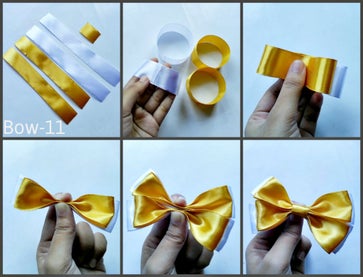
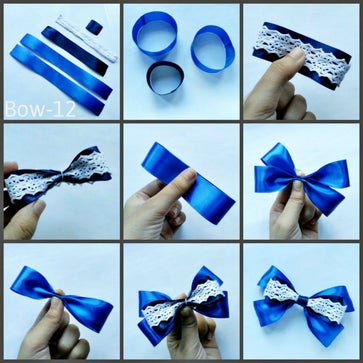
I've posted photos of important steps and lace measurements for each bow. Make sure to keep a small amount of lace for every bow to tie a knot in the middle. Attach the bow with a hair clip by sewing or gluing.
Bow-10: 4 Red satin ribbons (1 inch width, 7 inches length)
Bow-11: 2 White satin ribbons (1 inch width, 7 inches length)
2 Yellow satin ribbons (1 inch width, 5 inches length)
Bow-12: 2 Blue satin ribbons (1 inch width, 7 inches length)
1 Navi satin ribbon (1 inch width, 5 inches length)
1 White crochet ribbon (0.5 inch width, 5 inches length)
You can make these bow by simply following the pictures.
Monday, December 21, 2020
DIY Mens Apron
Every year I have the hardest time coming up with gifts for guys. My husband and Dad are so hard to shop for. They never tell me what they want and I always have the hardest time coming up with something.

To get started you’ll need an apron… I found this one at Jo-Ann’s!
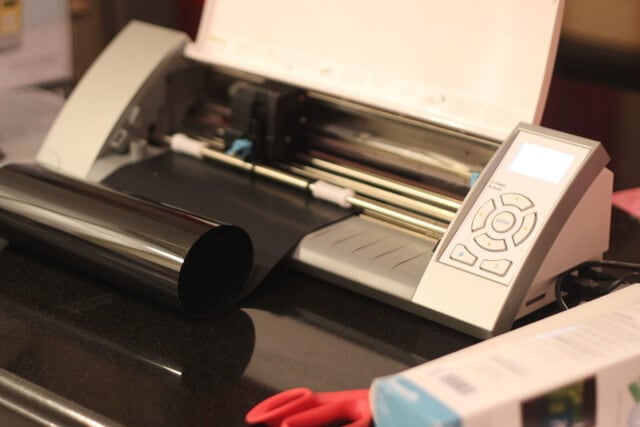 Then I pulled out my Silhouette and cut out “CAUTION: EXTREMELY HOT” with heat transfer. If you will be doing this with your Silhouette make sure to mirror your image horizontally before cutting.
If you don’t have a Silhouette you can easily use freezer paper or stencils for this as well. They sell packs of stencil letters at most craft stores. Just lay the letters down and brush over them with fabric paint.
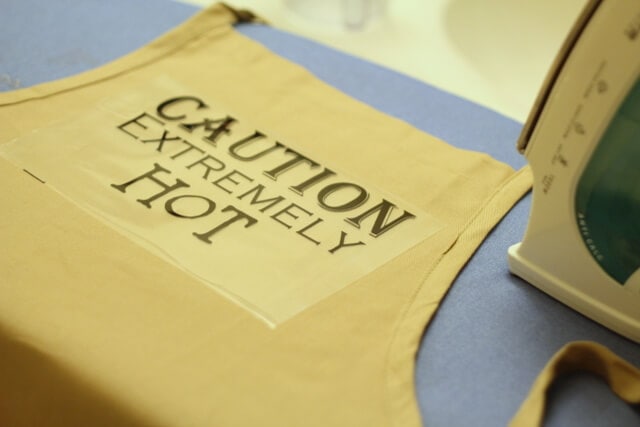 Once I printed out my heat transfer I stuck it on the apron and ironed it on. Make sure to put a piece of fabric over the applique before ironing so it doesn’t melt. With the Silhouette heat transfer you’ll have to hold it for about 45 seconds. Just peel up a little edge to make sure it has stuck. Once the heat transfer has fully adhered you can peel away the top layer.

That’s all! Simple as that! Such an easy gift, and perfect if your husband loves to grill!
DIY Stocking
Believe it or not, these stockings were pretty easy to make. Actually, Picking out the fabrics was probably
the hardest part! As much as I love the themed holiday fabric and colors, I fell in love with the elegant,
soft gray fabrics and white plush trims that created a “Winter Wonderland” theme.
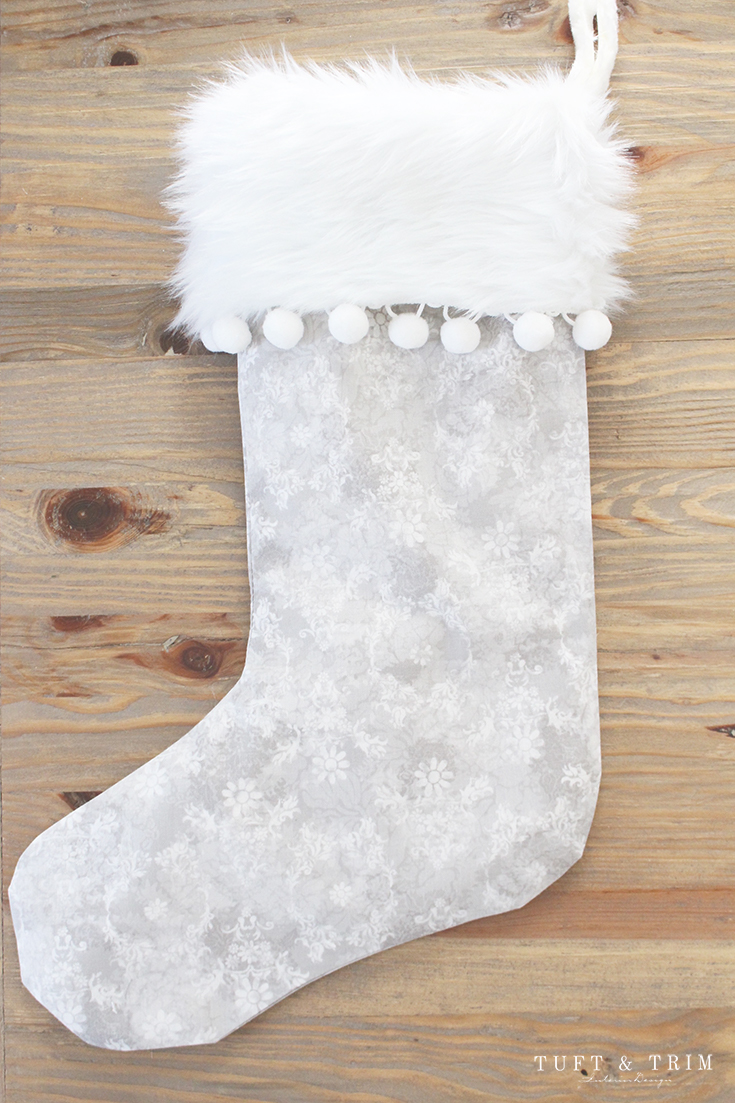
Pattern
1/2 yard of fabric
1/2 yard of lining
16″ pom-pom trim
a 16″ x 5″ fur trim or (16″x 5″ piece of fabric )
6″ piece of ribbon
Once you have your pattern assembled, you can pin or trace it on to your fabric. Make sure
the fabric is folded in half and the right sides are facing each other. I traced mine on to my
liner fabric first and cut an extra stocking to use as my pattern for the remaining stockings.
I found it easier to pin the fabric pattern and then cut around it with a rotary cutter .
Once your done cutting, you should have 2 pieces for both printed fabric and liner.
2. PIN
Next, pin both pieces together.
3. STITCH
Sew a 1/2″ seam around the stockings, making sure to leave the top open.
Try cutting a few notches around the curves so it takes away some of the bulk.
After your stockings are stitched, turn the outer stocking so that the printed fabric is on the outside.
Leave your lining inside out and place it inside your stocking.
4. CUFFS AND HANGERS
I used a 5″ wide white fur trim that I found at Joannes for the cuff and a fur ribbon from Micheals for
the hanger. You’ll want to cut the fur trim to 16″ long and the ribbon to 6″ long.
You can also use fabric for the cuffs, as shown below. If your going to go that route,
cut the fabric into a strip measuring 6″ x 16″ . If your fabric is light weight, you may want to double it,
so cut 12″ x 16″ and fold in half. For more instruction on a fabric cuff, visit fabric worm tutorial.
Once your cuff and hanger are cut, sew the ends of the cuff together to create a ban.
Now we put it all together. I recommend pinning the seam of the lining along the seam
of the outer piece to keep everything in place.
For the hanger, fold the ribbon in half and place it in the stocking, UPSIDE DOWN.
You’ll want to make sure it’s along the back seam with the loop end facing down. Pin in place.
Turn the cuff inside out and place inside the stocking. Make sure the seams are matched up and
the right side of cuff is facing the lining. Pin the at the top where the outer piece, lining, and cuff line up.
Stitch a 1/2″ seam along the top of the stocking.
5. TRIM
Flip the cuff inside out and hot glue the pom pom trim on. I glued it on the back side
when using fur, but if using a fabric cuff, you can glue on outside of cuff to finish it off.
Here is an example of a fabric cuff. I glued the pom pom trim on the outside so I didn’t have to hem the fabric.
DIY Teacup Lights

MATERIALS:
- Nested pans
- Partially burned candles
- Candy or candle thermometer
- Tongs
- New wicking
- Teacups
- Wick sustainers
- Wooden skewers
- In a small pan set over a larger pan of simmering water, melt down old candles; clip the thermometer to the upper pot, and keep temperature at about 185 degrees. Remove old wicks with tongs.
- Cut a piece of wicking to the cup's height plus 2 inches. Clamp one end to a wick sustainer; tie the other end around a skewer. Dip wicking and sustainer into melted wax to coat them. Remove and stick sustainer to cup's bottom.
- Pour in the wax, stopping 1/2 inch below the cup's rim. Allow wax to set, about 1 hour. The candle will harden with a well in the center. To even it out, use another skewer to prick a circle of holes about 1/16 inch deep around the wick. Pour in melted wax until surface is 1/4 inch below rim. Cut wick.
Sunday, December 20, 2020
Easy Last Minute Holiday Decor
Holiday Decor!!!!!!!
 because my holiday season has gone by in a FLASH. i've had to try to incorporate some last minute holiday decor around the house...with things i have.
 case and point this center piece was made of all thrift-ed finds of the past.
i've used this glass candle holder cupcake stands before. so i thought why not a bowl?
 placing the bowl on top creates a cute holder of things
DIY Dollar Tree Centerpiece
Need a festive Christmas centerpiece?!
No one will be able to tell this little tabletop tree is actually from Dollar Tree after this easy makeover! Use faux snow and a few holiday floral embellishments, also found at the dollar store, to dress up this inexpensive $1 Christmas tree into a pretty centerpiece to be proud of.

Supplies Needed:
- 18 inch tabletop Christmas tree (Found in-store at Dollar Tree for ONLY $1!)
- artificial snow spray
- faux berries, small pine cones, and any other floral embellishments (Dollar Tree)
- Christmas bow for topper (Dollar Tree)
- hot glue gun and glue sticks
- floral foam (Dollar Tree)
- 7 inch planter, or some type of basket, box, or container
Directions:

1. ) Take tree out of box and separate each branch. Instead of setting up the stand I used a piece of floral form to support it.

2.) Spray faux snow all over each tree branch, and let dry. (I found my can at Walmart for $1.50).

3.) Cut faux berries into smaller bundles and hot glue them to tree branches. Glue any additional embellishments. Try to make them evenly spaced throughout the tree.

4.) Place tree in a flower pot, basket, decorative box, bowl, or any other desired container. (I had these pots leftover from plants on my patio this summer. Look around the house for something to use!)
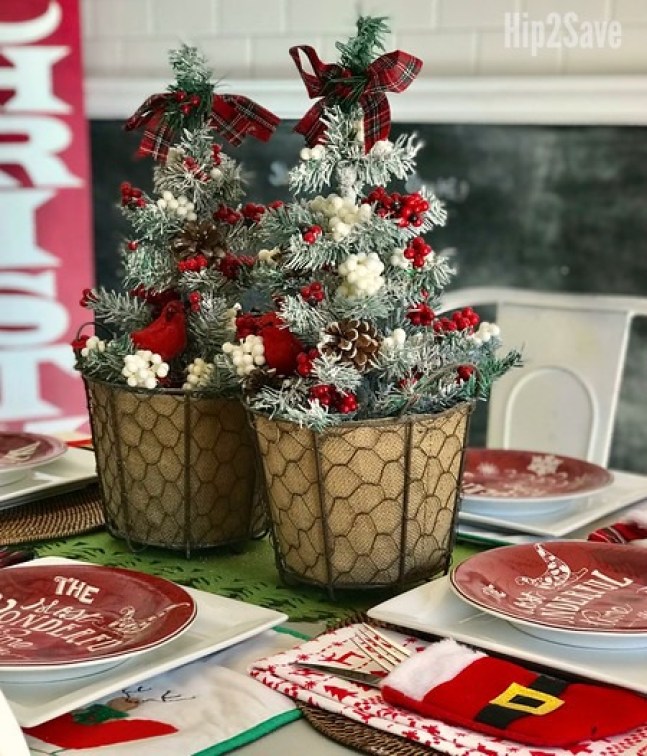
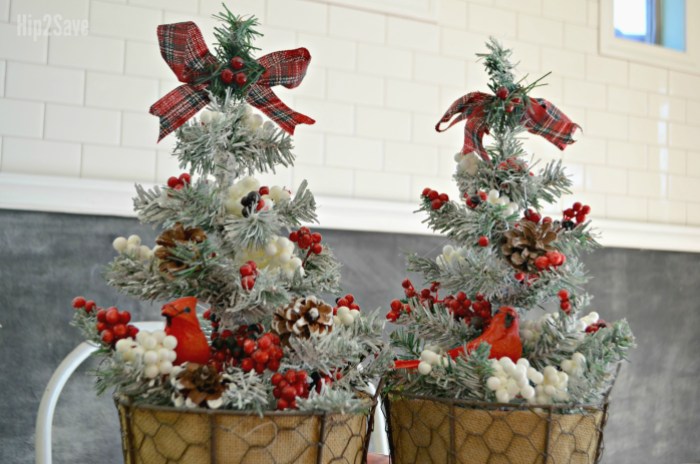
I’m passionate about decorating for Christmas without spending a ton of money, and these trees can be transformed into boutique looking decor with just a few easy supplies! I love how mine have kind of a farmhouse look to fit in with my house. You can customize them with any colors you’d like!
Dr. Seuss - Red Foot, Blue Foot
In this craft we are going to create our own foot book. It is an exciting craft for little ones! What you...

-
If you want to try something new this year then making candles might be something you find yourself interested in and with the holidays comi...
-
These are great starter ornaments for little one to do!!!!! Here’s what you’ll need to make these ornaments: 3 popsicle sticks (one with abo...


